 Now here’s a thing. During the Corrie meltdown Bishy of Zebedee fame decided that a Biffa out of his ram-jammed full barn would be a good starting point for something to do. His missus Elaine loved the idea as it got him out the house and Celia thought it divine as a load of old toot could finally go. Of course it probably won’t but at least it would get catalogued and put on their website and in the Zebedee List, if you still get a proper paper copy. The giveaway was the absence of a skip. I remember the first List I got. I think the Bluebird Toffee Balloon was for sale and someone told us not to bother! It came as a single sheet or two of stapled Roneoed quarto. Look it up. The Roneo is probably on the List. He’s probably got some paper as well and a pot of dried up ink if you are lucky (or not). Then again he’s probably got some back copies as well! In his lust for more storage space, amongst the stuffed badgers, half beer barrels, drop lines, Colt blast valve handles, flint strikers (spare flints as well) and bent burner frames, he came across a pile of cylinder fuel gauges. Problem was, where were they from and what would they fit? In an attempt to sort the problem out we went through all the gauges we had, old and new and measured them, then crossed checked them with what they now fit. By ‘gauge’ we mean the entire thing, float and all. The bit that tells you how much you have got left is the ‘contents gauge’. Then, thinking about the outcome of faulty gauges, it occurred to us that such information may well be useful to others. This treatise then refers only to Cameron, T&C, Colt, Lindstrand (LBL) and Sky cylinders. But first, what might go wrong with the little darlings that you bash and tap in the vain attempt to get another half litre out the cylinder or try and fathom out why its showing 30% yet the coil is glowing red hot as you attempt to arrest a plummet?
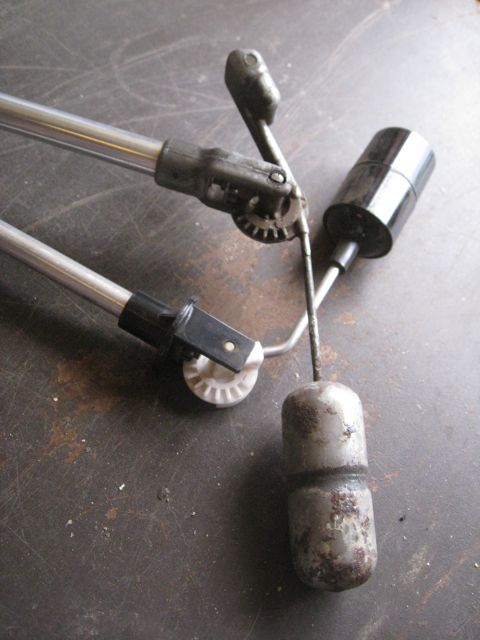 Gauges stop working for a number of reasons but more often than not its down to wear in the float mechanism. As the years passed by the floats and the associated mechanism switched from tinned or aluminium floats to plastic ones and the gearing from metal to plastic. As you have probably gathered the float movement is in the lower thirdish of the cylinder and the arm short enough to allow it to swing from fully down (empty) to nearly vertically upright (allowing for ullage) thus indicating there is fuel left. Once the float starts to drop then the contents gauge starts to register showing you about a third of a cylinder of fuel remains. Its not that accurate but good enough. The connection between the shaft and gauge is via a magnet so there are no seals involved apart from the gauge gasket between the housing and the cylinder itself. With the old metal type floats and gear wheel, wear results in the cogs jumping so either false readings are given or sticking takes place. Sometimes both. With the new plastic types wear in the spindle mouldings that allow the float to swivel eventually cause sticking of the float so again, inaccurate readings occur. This type of wear can be accelerated by transporting the cylinders horizontally if the float is in a position where it is not able to swing. Leaving cylinders standing for long periods can cause the mechanism to stick.
  If you think this may be the case gently turn the cylinder upside down and gently tap the top ring on a lump of wood. If that doesn’t free it or the problem recurs then its probably wear. Occasionally the shaft housing comes adrift from the bottom of the contents gauge housing then the contents gauge doesn’t move at all! Although it doesn’t prevent the gauge working, once or twice, we have found a leak from the contents gauge housing itself but that is extremely uncommon. The contents gauges themselves seldom fail unless the gauge glass (plastic) comes apart or the housing corrodes through water ingress or condensation. The best gauges ever fitted were the ones wrapped up in in aluminium coat as fitted to early Worthingtons. The worst are those fitted to the new style Cameron supplied ones.
The most common compliant by owners is that the gauge is sticking, interpreted as the contents gauge is not registering correctly. This sometimes the result of an incorrect gauge being fitted or more commonly the orientation is wrong. When carrying out proof pressure testing we, not infrequently, come across the wrong gauge fitted to a cylinder. If too short a gauge is fitted then it will start registering prematurely and show empty when an appreciable amount of fuel still remains. Now apart from the obvious set backs, if you fill your cylinders on trust from a mate’s bulk tank you could well be putting in a lot less than you thought and consequently might think your balloon is getting porous and your fuel costs high!
 The orientation of gauges is critical as is care required when fitting even if orientated correctly. This picture is a great example of how not to fit a cylinder up. Apart from the gauge being 90º out, the valve is in the wrong hole and the vapour take-off covers the gauge which won’t register anyway! If the gauge is fitted incorrectly or, if during the fitting, it snags the dip tube then it will not read correctly or simply stick as the float will be unable to move through its complete arc. As a rule of thumb if a the cylinder has a horizontal take-off then the gauge should be readable from the side the hose exits. The older style gauges have a square and triangular cut-out for the screws that hold the contents gauge screws in place the triangular one showing the direction of the swing of the float.
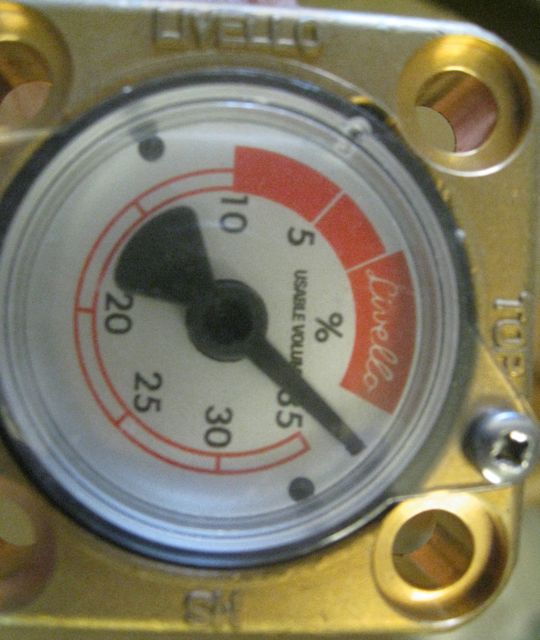 Older square gauges have an arrow broken by the word ‘Float’ written through, obviously indicating the swing. The new gauges have ‘Top’ marked on the top face. Regardless of horizontal or vertical take-off, with almost all Cameron cylinders and all Worthingtons the triangular cut-out (‘Top’ on new ones) should align with PRV. In the case of Colt, T&C, LBL and Sky the empty/full position should be aligned with the bleed valve, ‘Top’ on the new ones. These days the logical thing to do is to take a picture before removal on your phone providing you are sure the gauge was fitted properly in the first place!
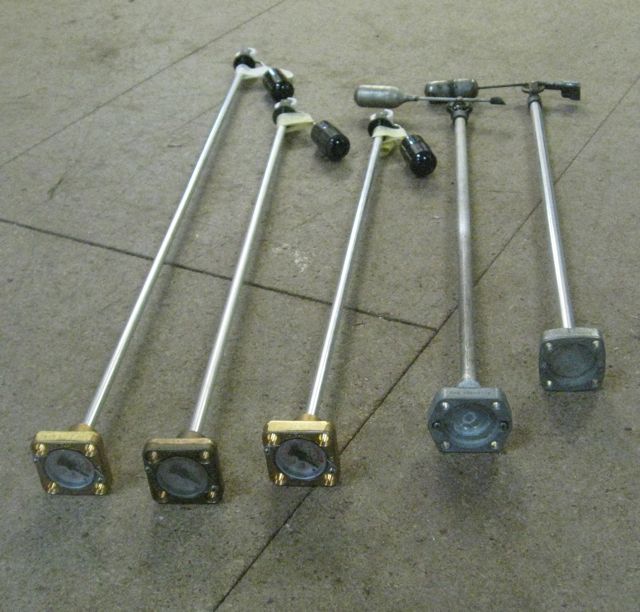
 As far as older UK manufactured vertical flight cylinders go there are only three current gauges supplied by Cameron Balloons. Historically, although the design of the content gauges themselves vary, the lengths between the original ones and the current ‘fits a range’ haven’t really, well nothing significant. The measurements we took were from the face of the ‘O’ ring (gasket)
  to the swivel pin on the float from new Cameron supplied gauges. As we have already mentioned earlier gauges had metal floats and workings but the measurements are similar. Contents gauges are available as separate items but beware the small set screws that hold them in place can break from corrosion whilst being undone or strip the thread of the housing if over-tightened unless great care is taken. They also are very easy to disappear after removal!
The details are listed by part number, measurement and application.
1. CB2551-0000 579mm (older metal type workings and float are 552mm). This is the original Worthington gauge. It also fits CB479 and the V20 (Colt, T&C, LBL & Sky).
2. CB2552-0000 637mm (I think the original T&Cs were slightly longer). Generically these are referred to as CBL45/60 litre. These fit CB599, CB2380, CB2385, CB2900, CB2901, CB2990 and the V30 (T&C, LBL, Colt & Sky).
3. CB2553-0000 803mm. Generically described as CBL 56/80 litre. These mainly fit the tall 80 litre jobbies CB959, CB2088, CB2383, CB2387, CB2903, V40 (T&C, LBL, Colt & Sky).
In the name of interchangeability Mr Cameron ensured that the existing stock also fits the new Duplex cylinders.
1. The CB2552-0000 fits the new Duplex 45 & 60 litre cylinders
2. The CB2553-0000 fits the new Duplex 72 litre cylinders.
When replacing gauges a new gauge gasket must be fitted. If the mild steel screws are corroded they should be replaced. Allen screws fitted to T&C, Colt and LBL cylinders, including Titaniums, are stainless steel and are usually fine to re-use. See descriptions for the sizes of the screws and bolts. 1/4″UNF Socket head cap screws require a 3/16″ Allen key and M6 cap screws a 5mm Allen key. All gauge screws should be refitted using low to medium strength thread locking compound e.g. Loctite 222 or 243. It is important to ensure the gauge gets tightened down evenly so gently tighten opposites to the correct torque (3-5Nm) value and then check the gap to make sure it is level.
All parts should come from the manufacturer and be accompanied by a Form1
1. The gauge gasket is CB2561-0000 fits all except the CB2990 (use CB2990-5000)
2. Mild steel screws CY5000-0014 1/4”UNFx7/8” (22mm long) fits Cameron CB426, CB599, CB497, CB959, CB2088 and Worthington.
3. Stainless steel Socket head cap screw (Allen Bolts) CY5000-0013 1/4”UNFx7/8” (22mm long) fits CB2380, CB2383, CB2385, CB2387, CB2900, CB2901, CB2902, CB2903.
4. Stainless steel Socket head cap screw (Allen Bolts) CY0006-3025 M6x25 fits V20, V30, V40 (Colt, Linstrand, Sky, T&C) and Lindstrand T30. Also some Thunder, Colt and T&C supplied Worthington.
5. Alugas cylinders (CB2990) from new are supplied with Torq T30 cap head screws (T30 tamper proof key required). The replacement for these are Stainless steel Socket head cap screw CY 0006-3020 M6x20.
SOME WARNINGS
In the case of aluminium cylinders, corrosion between the aluminium and the steel screws, even if they are plated, can make them very difficult to remove with the 
risk of damage to the cylinder threads. Corrosion can occur to steel bolts and screws used in stainless steel cylinders especially if the cylinders are stored in damp conditions.
Although it is true to say that virtually all Worthington cylinders use 1/4UNF for the fuel gauge threads Thunder & Colt did fit 1/4UNF Socket head cap screws (Allen head) and Cameron did supply 1/4UNF cap screws in place of mild steel screws (Fillister head) for a short while (2019). Just because it is a cap screw it doesn’t mean its metric. The simplest way to check is by using the Allen key itself. A metric Allen key will only fit properly in a metric bolt and an Imperial Allen key will only fit properly in an Imperial bolt. The fit should be snug with very little or no free play (depending on the quality and wear of your Allen key). Galvanised bolts 1/4”UNFx7/8” (22mm long or longer) were also used on the early T&C Cloudhoppers. They were all the same length despite longer ones being preferable for holding down the sensor for the buzzer. Never fit longer bolts than specified. Torque settings for all are 3-5 Nm.
Most importantly M6 and 1/4” UNF screws have a similar thread appearance. It is possible to mistakenly insert M6 screws into a 1/4 UNF female thread, but the fit will be very loose and the combination unsatisfactory. A 1/4” UNF thread will not fit into an M6 thread.
Always carry out a leak test, using leak detector fluid, following removal and the refitting of the gauge unit. Reference CBL MMIss10 Supplement 7.25.
Updated 07.05.2020