Having inspected and maintained Lindstrand hoppers ever since they first came out in the mid-90s it is actually not really surprising that we reckon we may have come across most of their foibles, not that they have many, and how a few minutes devoted to them, now’n again, will keep them in tippity top condition. I have to say that out of all the hopper burners I reckon the Lindstrand ones are the best. Its certainly the nicest looking and, although to be honest we haven’t actually weighed one, probably the lightest and most compact of the modern hopper units. It is certainly jolly powerful and delivers perfectly what it was designed to do. So, for your delectation, a briefly (or not that briefly) on caring for your Little Lindstrand Loveliness, lovingly created to carry you in lovely luscious light winds to lofty levels or some far land of lotuses. Cripes what happened there then?
 The first Lindstrand Cloudhopper bottom end, unsurprisingly, went along the lines of the Thunder Cloudhopper in so much as the burner was attached directly to a dedicated flight cylinder. It was a great bit of kit but there were initial niggles with jetting and the coil, although supported by three uprights, was attached to the block by only two of them, the third dropping on a locating pin. Probably an attempt to damp out expansion and contraction but in reality there wasn’t really anywhere to bolt the third leg down! The early ones also suffered from failure of the bearings that the load ring revolved on making the plot difficult to rotate but fortunately a Mod (not a bloke in a Parker) came out which solved the problem. The pilot light was liquid and it had a change-over lever which does tend to be quite stiff to operate but means that a single Jetstream-type toggle valve can be used as the whisper or main burner which, on the face of it,
  seemed a good idea but if you need to switch burners quickly on the approach then it could be a problem. The only real downside was that being an integral seat, cylinder and burner unit it meant that you had to refuel after every flight rather than simply swap cylinders and, although the burner was removable via a threaded ring and safety pin the supporting arms, along with the folding seat remained on the cylinder making that lump a tad cumbersome. Nearly forgot, over time the holes in the load-ring that take the Quicklinks attaching the envelope tended to elongate and wear, a problem cured on the MK2 by drilling more holes!
 Enter the Lindstrand Cloudhopper Series 2. Launched in 1999 this really heralded the modern hopper. With a simple frame and burner unit that could be broken down into two basic components which packed into a pair of very well designed padded bags and the ability to use standard cylinders of various sizes they had a winner. The burner coil now had four vertical supports, all bolted down, and separate whisper and main valves, again taken from the Jetstream burner, along with a liquid pilot light gracing the block. Attachment to the cylinder is via a short hose that plugged into the burner using a Tema fitting running through a lever action isolation valve on the top of the seat frame. Great idea. It was never cheap, a reflection of the quality and, as it is a very nice bit of kit which seldom comes up for sale, still commands a high price. Over the years there have been a couple of improvements to them including improved padding and a natty handle that attaches to the burner block to make inflations easier and, I’m informed, aids swivelling.
 Now despite my ranting on how marvellous they are they do have some annoying traits and as part of the annual inspection we always give them the old once over, just in case like, and quelle surpris my duck, we often find that bits and bobs need a bit of tlc or tightening up so here are a few pointers that may help. Please be advised that to do the job properly not only do you really need the proper tools but you also need a Lindstrand Maintenance Manual and any repairs signing off (if applicable). Things do come loose from time to time and usually that is all there is to it but you should always try and figure out why. Is it a lack of Loctite (if prescribed), a lack of lubrication or neglect causing the problem? If you are in any doubt about carrying out any maintenance ask your inspector or get it to a repair station. Of all the balloon systems out there all Cloudhoppers get you the closest to both flames and propane and as there is nowhere to go if you get a leak or a problem develops and with not much in reach it is vital that they are kept in tip top condition. For the hopper pilot pre-flight checks should be more than a cursory glance round! Right, on with the show Captain Singe, leak detector and spanners at the ready.
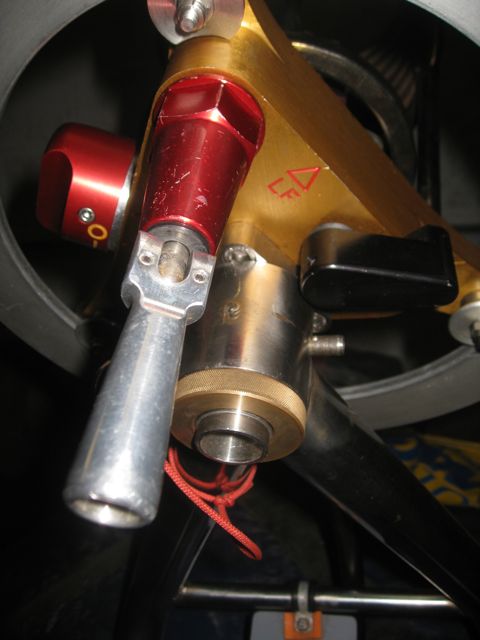
 The igniter is the same as the one fitted to the Jetstream and depends on a ceramic sleeve for insulation and heavy handling can cause cracks or even breakage to occur quite easily. The igniter assembly itself is held in place firstly by a threaded collar and thence the aluminium burner body by a grub screw which also allows you to adjust the gap between the electrode and earth lug on the pilot light cup. If the collar becomes loose then the internals will rattle about and this usually results in the ceramic developing cracks which will short out the spark. If the grub screw comes loose then the whole lot can eventually drop down increasing the gap and preventing the spark from arcing. Over time the unit also seems to work up inside the block closing the gap. Normally the bottom of the igniter unit should be flush with the body of the block. On top of all this, literally, the pilot cup is attached to the pilot light tube by another grub screw which can also come loose and cause the earth bracket to go out of alignment or prevent a decent earth and cause an intermittent spark. The igniter itself is pretty reliable and unless they get damp work well. To adjust or remove the igniter unit unscrew the grub screw in the side of the block
 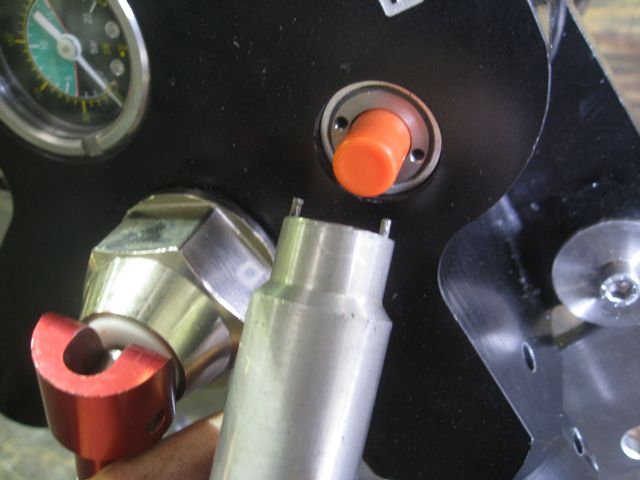 a few turns and the whole lot should drop out through the bottom or be able to be moved to adjust the gap. To release the igniter itself unscrew the collar using a peg socket (with care a small ended set of pin nose pliers work well enough if you don’t have the Lindstrand tool). The igniter tube can occasionally corrode and stick in the block making it tricky to get out or move. If this happens undo the collar and drop the contents out then very gently tap the tube out with the aid of a piece of wood and WD40.
So, if there is no spark then it is either the igniter itself, the gap between the earth bracket on the pilot cup, the collar coming undone or the ceramic is cracked or broken. Most commonly though, through use, the igniter has probably worked up inside the block and closed the gap.
 As part of the annual inspection we always check the bezel that holds the pressure gauge in place as invariably it will be loose. A loose gauge can result in a leak. If the gauge itself fails it is best to order the new one with a new bezel as the older bezels will not fit over the newer gauges and also ensure that the new gauge comes with seals. Now, as a fire in your ear can be uncomfortable, if you find the bezel is loose and you tighten it up (not ferociously) then check the gauge with leak detector to ensure all is still well.
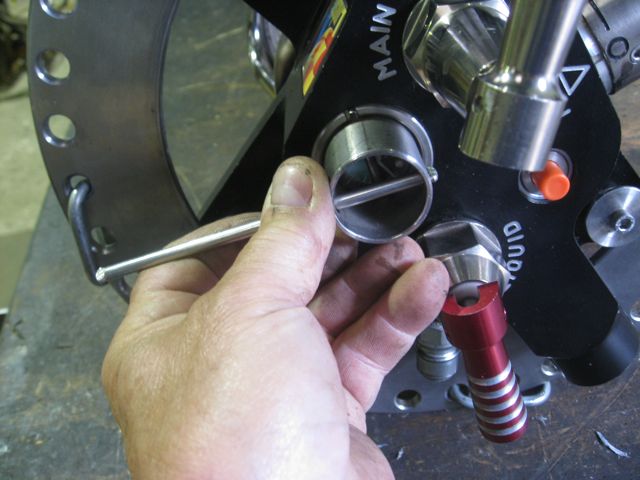
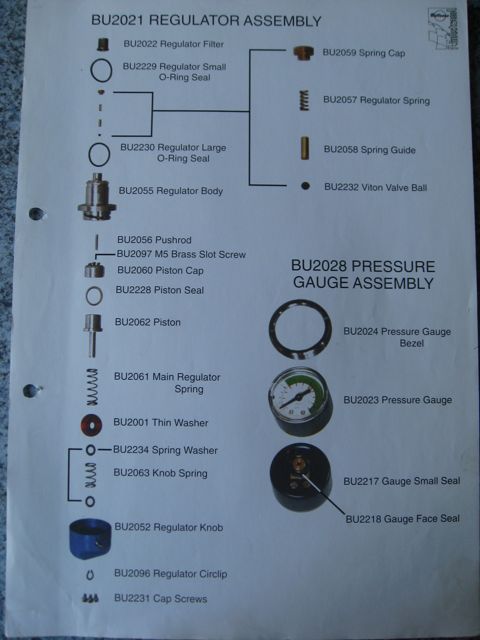 The pilot light valve and regulator assembly is once more identical to the Jetstream one and requires little maintenance but like all piston type regulators they are prone to getting clogged up with the heavy ends from grubby propane. We tend to find they need cleaning out every couple of years or so. If you are not going to be using your hopper for a while it is probably better to store the burner with the valve knob pointing down. For a detailed description of dismantling and servicing the unit look in any of the Lindstrand Maintenance Manuals. Occasionally the circlip on the piston stem, visible in the centre of the valve handle comes adrift or the stem itself sticks making the pilot
  light not work at all or not shut off properly. If the pilot flame is spluttery it is most likely caused by the piston assembly sticking or the tiny Viton sealing ball sticking. If you take the regulator apart for any reason you should replace the two O-rings in the block, the circlip and replace the Viton ball. There is a mesh filter in the block that occasionally gets clogged up if you are using dirty propane. This can normally be cleaned with a blast of compressed air. The large regulator spring-seal that goes around the piston seems pretty hard-wearing and seldom needs replacing.
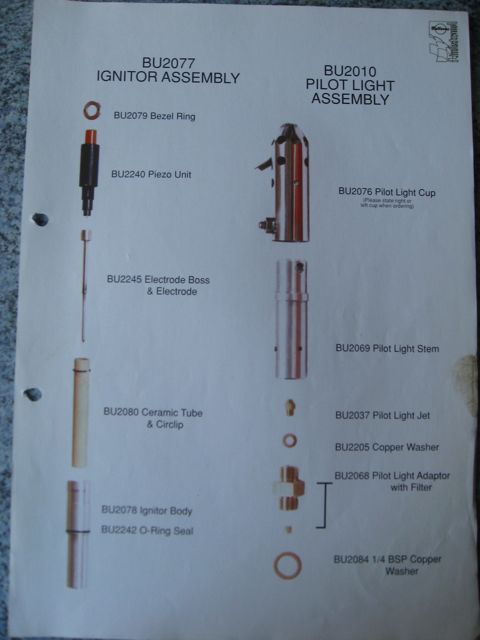 After this comes the pilot light itself, again common to the Jetstream jobbies. The pilot jet is tiny and does get blocked from time to time despite a filter under it. Apart from that carbon deposits can build up in the pilot tube preventing a decent pilot flame. To get it apart you’ll need to undo the small Allen grub screw in the side of the pilot cup and whip that off then, with a decent well fitting bar through the two holes in the pilot tube, unscrew that. Beware, if you muller the holes then the cup will not fit back on. The jet will now be visible in its mounting. We tend to fit a new jet and filter if it is blocked but if you are away somewhere unscrew the jet and from the back, rook about with a pin on the inside to dislodge any blockage and blow through the wrong way. Do not try and jam something down the small hole as any enlargement will result in a poor pilot flame. The filter lives under the adaptor. Whilst the cup is off its always a good idea to clean up the underside of the earth bracket with a bit of emery the eighth.
To summarise then. If the pilot won’t run properly or not at all then it is going to be a missing or dislodged circlip, dirt and oil in the regulator assembly or a blocked jet, filters or tube.
 The blast valves seldom give trouble but there is a Cameron Service Bulletin out on the stems so if any leaks or sticking of the valve develops it would be sensible to change the stem and all the seals while you are at it. Sticking is usually a result of the inner quad seal going dry or the friction washer on the top going tight and gripping the stem. This was a common problem early on but not often found on later burners. The flame should stop pretty quickly once the valve is closed with any residual flames in the jet going out within seconds. If there are residual flames at the jets for any appreciable amount of time then the main seal (seal carrier) is probably leaking. If you need to get them apart then wrap the body of the valve in insulating tape before attempting to undo it. This will prevent damage to the finish and always reassemble with a new copper washer. We do use Cameron KFT 125 grease on the seals when reassembling which prolongs their life enormously. It is advisable to check the tightness of the beautifully named ‘toggle valve pivot pin grub screws’. Open the valve fully and look under the handle where you will see a small drilling in the handle body each side of the stem. At the bottom of these are small 2mm Allen grub screws. They should be fitted using Loctite 243 and be tight but not overtight. If they come loose then there is every chance the pin will come adrift and you will have no handle. We have never had any problems with the earlier change-over valve the only complaint being that they can be quite stiff to operate but this is quite normal.
 That’s the twiddly bits sorted now for a quick bit of fettling around the rest of the burner. The coils seldom give any trouble and we haven’t had any leakages from them however we have found the 19mm union where they attach to the block loose on some of them. This should be tight. Do not use ptf tape on this joint. Jets do leak. The easiest way to see this is to run neat propane through them and watch for ‘dampness’ around their base. There was an upgrade to these jets available using jets of varying sizes so if you remove the jets to clean them ensure they go back in the correct order. On the Mk2 the jets adjacent to the two jet ring feeds are blanked off intentionally. It’s a bit more random on the Mk1! Tightening the jets with an
 8mm spanner usually cures the problem but occasionally you will find that there is a small crack within the thread of the jet itself causing the problem and a new jet will need to be fitted. These have a tapered thread and are very easy to overtighten and break off so be careful. If a jet does break or you find a broken one don’t panic just very gently tap the tapered tang of a small file into the centre and the broken bit should come undone quite easily. While you are in the area its always worth checking the Allen bolts that hold the vertical coil brackets in place.
 Now, what no hopper pilot wants to happen is to part company from their envelope. That would be bad so make sure the screws holding the load ring bearings in place are good and tight and the bearings free and not rattly. Underneath them is the security washer held in place by
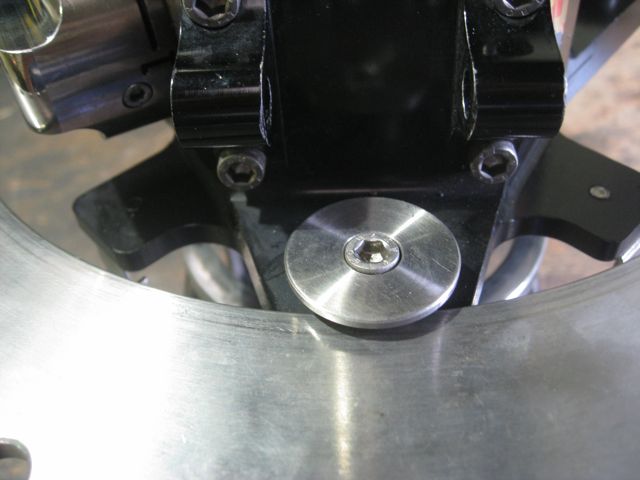 a Allen bolt. These must be tight as well. It is actually quite hard to remove the load ring through the top of the burner without the security washers being removed so worst case scenario if a bearing failed would be that the whole shooting match would just jam but you don’t need that sort of excitement. The load ring itself should be regularly checked for wear and damage along with the Quicklinks that the flying wires attach to. If you leave them on the ring make sure the gate is fully closed and tight.
 The seat unit is pretty self explanatory but again do check the Quicklinks regularly to make sure they are good and tightly shut (use Loctite) and that no damage has occurred to the straps or fabric of the seat and harness. Check all the stitching especially the boxes. On early built in units a long bolt and two shorter bolts are used to hinge the seat. Make sure this is in fine fettle and that there is indeed a locknut on the end of them. The harness clasp should work faultlessly and pressure should be necessary to both attach the straps and to unlock them. On the later models the isolation valve is mounted on top of the top rail of the seat frame. Check the fittings for leaks as part of the pre-flight check and always make sure that the Tema connector (or both) have undamaged seals in them. Lubrication is the key to this! The only thing that does seem to happen is damage to the seat base including cracking of the board especially on the one piece Mk2. These are made of plywood and can be replaced quite easily by unzipping the cover however, the hole that the straps run through on the Mk2 is exceedingly tight so it is wise to make the new one with a slightly larger cut-out. Finally the tank straps on the Mk2 must be in really good nick and work properly. They are much longer than standard and must be used doubled over. Any damage, get a replacement.
If Lindstrand Technologies do bring out a new Cloudhopper bottom end what would we like to see? Well the block could be lighter but, as it is, it is simple and easy to keep clean and access every component. The pilot light regulator could be simplified and easier to dismantle and clean but is pretty reliable so may be nit picking there. Although the ceramic insulator is prone to cracking they are great insulators so maybe leave that as well. Top priority would be sorting out the jets coming loose and maybe develop the burner so all jets can be used making it a proper mini-burner that can be used with larger envelopes as it is pretty good and is nowhere near used to its full potential. Hmm, that means it doesn’t need a lot of improvement apart from the use of a bit of Loctite here and there!
So there you have it, a briefly guide to maintaining your Lindstrand hopper bottom end. Don’t bodge it, mend it and use only genuine parts with a Form1. Pay heed to any Airworthiness Directives, Safety Bulletins or Service Instructions that come out even if you are using it under a Homebuilt or Annex 2 balloon.  Cameron Balloons now carry pretty much all the Lindstrand parts and as most of them are common to the Jetstream supply isn’t a problem. Make sure that if you do carry out any repairs then check for leaks using soapy water or a decent quality leak detector afterwards. Finally our criticism of all the manufacturers is that they do not supply burner bags as standard. Why on earth not? Bucking the trend though Lindstrand provided nice robust comfy bags for all the Cloudhopper bits so please use them for transportation.
The bits of paper you need are listed below. Both the Cameron Flight Manual Supplements cover assembly and operation of the Mk1 and Mk2 in detail if you can’t get hold of the Lindstrand Supplements. Clicking on the images, including the diagrams, should enlarge them.
(i) Lindstrand Maintenance Manual Supplement 3 covers the Series 1 Cloudhopper.
(ii) Cameron Flight Manual Supplement HABFM10 8.11 covers the Series 1 bottom end under Cameron envelopes. http://www.cameronballoons.co.uk/uploads/Approved%20Modifications/Support%20Files/Flight%20and%20Maintenance%20Manuals/English/i10-8-11-Iss1%20Master.pdf
(iii) Lindstrand Flight Manual Supplement 9 covers the Series 2 Cloudhopper.
(iv) HABFM10 8.42 covers the MK2 under Cameron envelopes. http://www.cameronballoons.co.uk/uploads/Approved%20Modifications/Support%20Files/Flight%20and%20Maintenance%20Manuals/English/i10-8-42-Iss1%20Master.pdf
(v) Lindstrand service Bulletin No 2 dated 14.03.96 covers the Cloudhopper Mk1 Bearing Replacement and can be found on the Cameron website at http://www.cameronballoons.co.uk/uploads/Approved%20Modifications/Support%20Files/Service%20Bulletins%20-%20All%20Types/LSB_02_1.pdf
(vi) Cameron Service Bulletin 23 concerning valve carriers and stem modification is at http://www.cameronballoons.co.uk/uploads/Approved%20Modifications/Support%20Files/Illustrated%20Parts%20Catalougue/SB23-0.pdf


