 Seems that last month we had more than the normal number of phone calls asking if we could offer advice on uneven tyre wear occuring specifically on Westfalia Trailers but there are plenty of examples of all makes and types of single axle trailers running with the inside or outside edge of both tyres wearing prematurely. As for Westfalias, this has long been one of their design features but actually it may well be that for a lot of long suffering, bashed down dirt tracks and generally abused, balloon trailers the bushes have just worn out and they now need love. Don’t get me wrong here, despite them being very stylish, towing well (providing they are reasonably well-loaded) and lasting surprisingly longer than they ought they are not really that beefy, especially considering the conditions many have to cope with. In truth they are built very lightly and do have some rather annoying traits like bending
 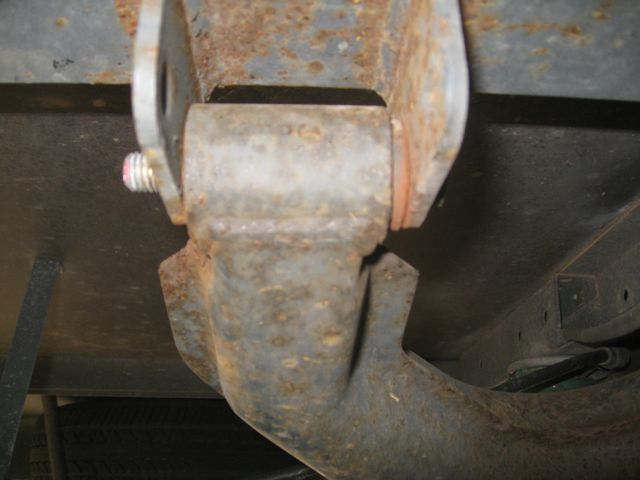 drawbars, fracturing hinges and generally falling to bits. Having said all that a lot of credit must go to the many owners who treat their trailers with little or no care. Amazing as it may seem a bit of maintenance, or mending things when they first go wrong, can actually stop a wheel falling off or a new set of tyres only lasting 50 miles. To assist you the pictures should enlarge if you click on them and we’ve put the spare ones at the end.
 If you picture the geometry of a trailer as a isosceles triangle, where the tow hitch is the peak and the axle the base, on single axle trailers if the wheels, or even one wheel, is out of alignment then, when towed, it will always try and balance any forces acting on the tyres. In the case of a bent towbar for example, the trailer will try to tow slightly off centre (crab) and you may get the inside edge of one tyre and the outside edge of the other wearing. Vertical bending or damage to the stub axle, the rim or the tyre may result in uneven wear to one tyre only. If the tracking (toe-in or toe-out) is affected, even on just one side, it will affect both tyres. This treatise, although referring to the Westfalia trailers, does apply, pretty much, to all (including caravans) but is specifically aimed at single axle types. In the case of trailers fitted with a beam axle and rubber suspension then if uneven tyre wear occurs usually the only solution is a new axle. That’s covered that then!
 There are three types of uneven wear on tyres. If the wear is to one tyre then it may be down to the tyre itself having been bished and bashed on kerbs or down holes or being run at the incorrect pressure. This can lead to the tyre becoming distorted and subsequently wearing abnormally. Easiest way to check is to jack the trailer up, spin the wheel and simply have a look at the tyre’s profile as it rotates from the side and from the rear. Surprisingly small amounts of distortion will cause uneven wear so if nothing is visible then gently rest your hand firstly on the tread and spin the wheel then do the same to the sidewall. If there is a lump or wobbliness then you will most likely feel it. The other give-away is a damaged rim and you can be sure no one will remember how it happened! Another possibility is an incorrect camber (vertical wheel alignment) angle. Again this is usually the result of clouting the kerb or a gatepost and quite when it happened will also probably remain a mystery. What tends to occur in these incidents is that the stub axle gets bent or the mounts under the trailer that carry the suspension unit get twisted. We have come across broken mounting bolts which will also affect the alignment of the wheels. In the main though any damage, unless it is to the tyre itself, the rim or has only affected the camber, uneven wear will occur to the tread of both tyres. Uneven wear to the insides or outsides of the tyres is down to horizontal wheel alignment (toe-in or toe-out). This is what is commonly referred to as the tracking. To compensate for suspension movement when in use (caused by the load, the drag on the suspension and tyres) the wheels are usually set slightly toe-in. The degree of toe-in depends on the suspension movement under tow to ensure that the alignment ends up pretty well parallel when in use. This is particularly the case with beam axles that use rubber suspension where movement under load can be quite pronounced. If the tracking goes out, even on one wheel, then the tyres will both wear on either the outside if the toe-in is excessive or on the inside if the toe-out is excessive. So basically we can say that the tendency on single axle trailers is for toe-out to be induced when being towed so they are set with a degree or so of toe-in when stationary. With Westfalia Trailers the design of the suspension also means that there will be more load on the inner bushes than the outers which, in time, will eventually cause toe-out as the inner bushes wear and move. Finally, abnormal tyre wear can be caused by incorrect tyre pressure which fortunately is quite easy to detect and remedy. If the tread in the centre is worn and the sides are alright then it is over-inflated. If the wear is on the edges but the centre is fine then it is under-inflated. Running at incorrect pressures can cause distortion and damage to a tyre especially if the tyre itself clumps a kerb. Most standard 4ply tyres are designed to run at a maximum of 36psi. Smaller commercial tyres (6ply and above) run at anything between 55-95psi. If you look at the small print on the tyre wall it will tell you the maximum load and the maximum pressure. If you run on standard 4ply tyres, as most Westfalias do, then you should have 36psi in them. Check the tyre pressures regularily.
 By far the most common ailment on the Westfalia is abnormal wear to the insides of the tyres. Apart from abusive use like hammering down bumpy roads or farm tracks in hot pursuit of the balloon the Westfalia suspension has a built-in design feature that after time will result in the tracking going out. These trailers use a trailing wishbone type of suspension with the suspension itself provided by a spring and damped by a shock absorber. Although it is fair to say that a knackered shock absorber can produce uneven tyre wear it tends to be negligible on trailers but a damaged or broken spring can, but we haven’t ever seen a broken spring. We have seen a missing spring though! While we are in the shock absorber area please note that replacing shock absorbers will not affect the ride height of the trailer. The springs govern the ride height so if your unloaded trailer sits unevenly it is a worn spring not a shock absorber. However the shock absorber does prevent the wishbone from dropping too low and the spring from over extending should the plot become airborne so if they get broken they must be replaced. The wishbone is mounted to the trailer by two bushes with bolts running through then.
 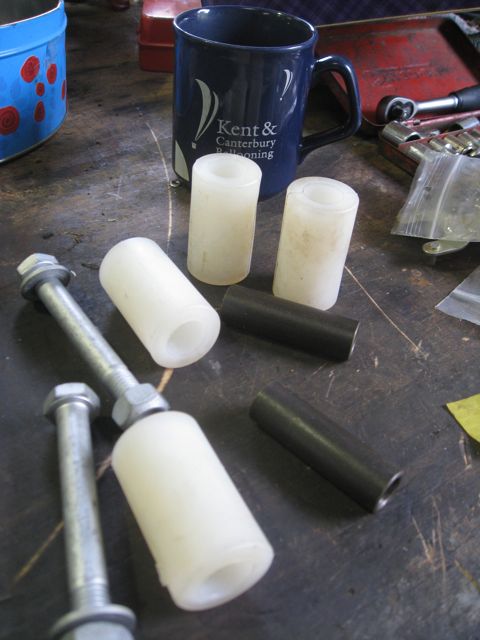 These bushes are nylon and after a while they do wear and move, the inner one ahead of the outer. When this happens it causes toe-out to the wheel increasing once the trailer is in motion and as a result the inside edges of the tyres
  will wear. Of course you can speed this process up no end if you drive at speed over kerbs or speed humps and additionally you will most likely succeed in bending or twisting the inner mounting brackets where they are attached to the chassis. Likewise trying to keep the trailer airborne as you whizz across a ridge and furrow field will achieve similar results. Loose, damaged or missing mounting bolts will also cause the wishbone to go out of alignment.
 Having said all that, do not assume. Obviously you need to identify the problem first but there may be more than one problem or the damage be more widespread than first noticed. The wishbone itself is made in two pressed steel halves and although quite tough on account of the curves in it we have found examples of them being bent most usually when a stub axle gets damaged. We replace the complete wishbone if the stub axle is out of alignment as invariably it will have damaged the wishbone as well. We also never treat one side in isolation but will drop both wishbones out and measure then up against each other even if we are only replacing the bushes. We always replace the bushes on both wishbones as they tend to wear evenly so its not worth just doing one side.
  It is fortunate in some ways that the wishbone mounts are rather pathetic as they usually tend to absorb any movement before damage is caused to the wishbone itself and can, more often than not, be straightened out with a bit of heat, gentle bashing, straight edge and a tape measure. The easiest way to check wheel alignment is with a piece of wood. Now this may not seem very ‘Tyres R Us’ high tech alignment gauges but if you can detect it this way it is going to be out, that is for sure, and you can also identify if it is one side or the other which may point you towards another problem. Check that the tyres themselves don’t have any bulges in them and hold a decent length of straight wood horizontally across the sidewall of the tyre. The gap between the wood and the trailer bottom chassis rail should be more or less the same forward and aft of the wheel. If its greater towards the front then its toeing-out. Simple. So, mon braves, let us explain how to replace the bushes as this is usually what the problem is and it is a job that can be done providing you have a few decent tools, a drill and possibly a grinder. We would strongly suggest that you empty the trailer first. For the purposes of this article we will go about the repair without turning the trailer over. If all goes well and it all comes to bits it will save time.
Before you jack it up do grovel underneath and try and loosen as many of the bolts as you can. It is far safer to do this with it sitting on the deck. This is also the best time to decide how you intend to go about the repair. If the wishbone mounting bolts are seized then it is easier to remove the lid and turn the trailer over however, compressing the spring will be necessary to get it all back together and this can be awkward but is achievable using heavy volunteers or a decent bar (not your local). Instructions for removing the lid are at the end. There are two mounts on the chassis for each wishbone. Slacken the nuts and see if the bolts turn. If they don’t you are going to have to cut them and already you may decide on plan B! Slacken off the bottom bolts on the shock absorbers, these usually present no problems.  Underneath the wishbone, directly under the spring between the shock absorber brackets, you will find a bolt. For some odd reason these are occasionally 16mm. Spray a decent amount of WD40 (or similar) into the centre of the bottom of the spring where this bolt protrudes through. Undo it fully and take it out. There is a locknut on the spring locking plate on the other side. Nothing drastic will happen when you undo the bolt but you may have to tease the spring in its housing with a tyre-lever to get it out. This will leave the spring locking plate floating about in the middle of the spring. Don’t worry about this.
  Next up let the handbrake off and disconnect the cables from the balance bar. Then pull the cables off of the sleeves on the back of the brake drums, drop the lower half off and unclip them from the linkage in the back of the drum and get them out of the way. Now loosen off the wheel nuts, jack it up and put some decent stands under the back crossmember and under the front of the drawbar. Have a cuppa.
 Take the wheels off and put a trolley jack or similar under the shock absorber bracket and jack it up a touch. Undo and withdraw the lower shock absorber bolt. Now lower the wishbone as far down as it will go. The spring will stay in place and you will be able to retrieve the spring mounting plate that sits on the wishbone and get the spring locking plate out of the middle of the spring. Next, if they are free, drive the bolts out of the bushes, outside ones first, and pop a decent screwdriver in their place or if they are loose leave the bolt just located. Now do the same to the inner ones. If they have come out you can now withdraw the screwdrivers. It is unlikely that the wishbone will fall out. They usually need a tyre lever to persuade them down but when they do drop they are quite heavy so beware.
  If you are truly unfortunate (or actually have a typical Westfalia) the inner mounting bolts probably won’t budge. Don’t bother bashing them they are not going to move as they run through steel sleeves and they will be rusted in place. You will probably notice that there isn’t a gap between the bush and the mounting bracket one side but on the other there is an appreciable one. This is when you will really wish it was upside down. Have fag and another cuppa (or open a tinnie) and head off in search of a grinder with a narrow cutting disc, pair of decent gloves and goggles. Put on a long sleeved shirt.
  At the end without the gap (or the smallest gap) cut off the bolt head or protruding bolt flush with the bracket. Now comes the tricky bit. The narrow cutting discs will do this but you need to take great care you don’t cut into either the wishbone itself or the bracket. Patience and a decent light is the best way. You need to cut as closely as you can to the bracket. You will be cutting through the nylon bush which throws hot nylon out and then the centre sleeve before you hit the bolt then out through the otherside of the sleeve again. Now pull the other bolt or screwdriver out of the other mount and let it drop. There should be enough give to wriggle the bit of cut bolt thread out. You will probably need a decent tyre lever to help with this but it will come out. If you can’ bring yourself to cut between the mount and the wishbone then you can opt for cutting the bolt head and the protruding thread flush to the outside of the bracket and with some gentle heat spread the mount apart until the thing falls out. Beware that the nylon bush is bound to catch fire if you do this! You will need to straighten the brackets up again before refitting though but that can be achieved with a decent copper hide mallet and a tape measure.
 Once the wishbones are out then measure the distance between the mountings and ensure everything is the same. Although these trailers are jig built there can be errors. The mounting brackets should be 90º to the chassis in both planes. The measurement between the inner faces should be about the same as the inner sleeves. Have a good look to make sure the mounting brackets are not twisted and that the welds are sound. All the bolt holes should be in line. Then have a good look at the wishbones and measure them up to make sure they are the same. Once the old bushes are out and the sleeves cleaned then you can run straight edge through then to make sure the housings are in line. A decent bit of timber will do the job. We use a bit of flat steel.
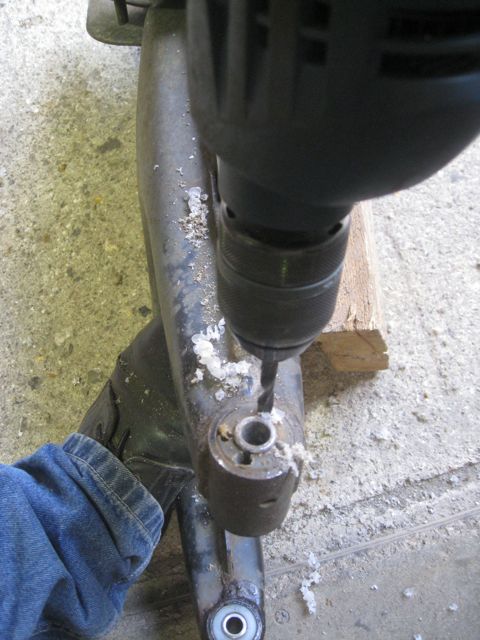 Now comes the removal and fitting of the bushes. Don’t even bother trying to drive them out as it won’t work and in the end you’ll do more harm than good. Prop the wishbone upright and get a 7mm drill or at least one that will fit between the wishbone bush housing and the steel sleeve and drill through the nylon at least four times. You will then be able to simply tap the whole lot out. Simple. Turn it over and do the same to the other one and then clean the housing up with a decent bit of Emery the Eighth. The new bushes should be fitted first then the inner sleeve fitted. The only real problem with fitting the new bushes is they can tend to swell rather when pushed or pulled in.
 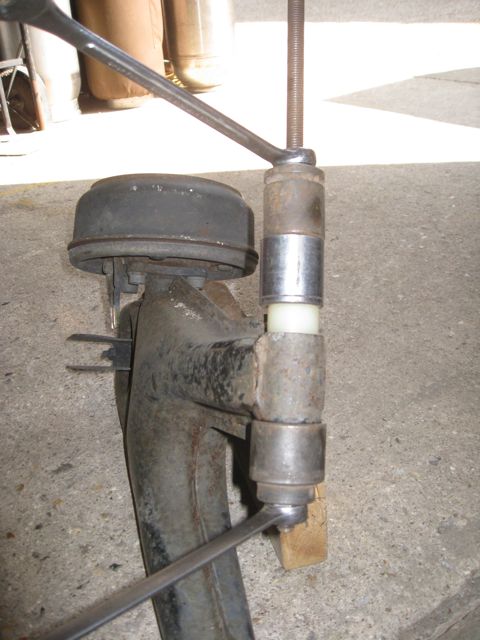 We splodge a bit of washing up liquid on then before fitting and use a length of M12 threaded bar to do the job along with a selection of ½ inch drive sockets. Now just occasionally you can simply knock them in with a No2 Thor copper hide hammer but beware that this doesn’t always work. Gently tap the bush into the sleeve. Pop the threaded bar through. Find a socket of the same diameter as the bush and drop it drive side onto the bush. We simply use another one upside down to bolt against with a nut. On the other end use a socket that is larger than the sleeve and slide that over and stick a nut and washer on it. Then commence tightening which will draw the bush into the sleeve. The bush should end up flush with the sleeve’s faces. If it sticks and won’t budge it is probably swelling under compression. All is not lost. Release the puller and pop a close fitting Jubilee clip around the bush so its
  sitting on the edge of the wishbone’s sleeve and tighten it up. Replace the socket with one slightly smaller in diameter than the clip and tighten away. This usually does the trick. Once its all lovely and in place then tap the inner sleeve in and pop the threaded bar through. Use the original socket on the back and stick a decent washer on the inner sleeve, tighten the nut back down and wind it in. It should end up protruding equally on both sides of the bush. Repeat on the other arm. Job done.
 Re-fitting the suspension is sort of a reversal of removal as Mr Haynes would say. If you are doing this under a jacked up trailer another pair of hands would be a help. For re-fitting, set the brake drum on the trolley jack. I tend to try and get the inner bush roughly into place first and stick a small bar to hold it there the get the outer one in. It can take a bit of persuasion to do this but eventually they will align and you can drive the bolts, with a wipe of Copperslip to the unthreaded portion to make it easier for the next poor soul, back through. Pop the nuts on the ends but just nip them up. Next jack up the wishbone until it gets close to the spring.
 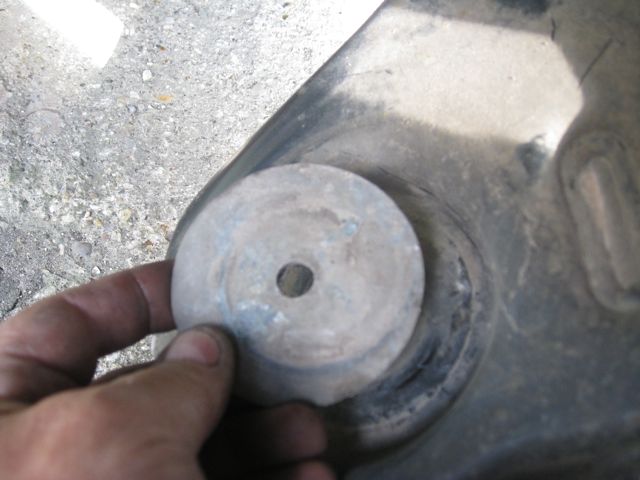 Make sure the spring plate is sitting on the wishbone and jiggle the clamping plate into place on the inside of the spring. This is profiled to fit the end of the spring’s coil so ensure it is in the right place. I always take the bolt and clean it up and ensure it turns freely in the lock nut before attempting to fit it. You will need a bucket of patience now. Once you’re happy, jack the wishbone up until you can reconnect the shock absorber then continue until the spring contacts the wishbone.
  I then put a small bar up through the bolt hole below the spring, spring plate and try and catch hold of the locking plate. Carry on jacking until the weight of the trailer is just on it. Now you’ve got to get the bolt aligned with the locknut on the locking plate. This can be a right fiddle but you will get there in the end. I use a tyre-lever to move the spring in its housing until I feel it catch the thread then tighten using a 3/8th drive ratchet and socket before tightening with something a bit heftier once its back on the deck. Once that is done get the jack out of the way, reconnect the brake cables (you may have to re-adjust the brakes), put the wheels back on and lower it back down. Now grovel back underneath and tighten everything up. Then check everything again just for good measure. How tight is tight? Good and tight, as in about 70 ft lbs for the mounting bolts and shock absorber and 55 ft lbs for the spring retaining bolt. Job done and, if you’ve timed it properly, it will be beer o’clock.
As promised, to remove the lid
 Now in an ideal world it will be nice and sunny and everything will come undone just like in a Haynes Manual but the reality is that it probably won’t. There aren’t many things to undo but to be totally honest we never expect the bolts to come cleanly out of the bushes and usually discover the brake shoes are shot or a bearing is gone so what should take at most an hour a side can take all day but there are some nifty solutions not least starting by emptying the trailer out, taking the lid of and turning the whole thing upside down. Everything then becomes so much easier. If you fancy that method then drop the tailgate (very important) and open the lid as fully as you can and get a couple of fellows to hold it whilst you undo the 13mm nut on the outside of the strut housing on the lid. Although you can loosen them under no circumstances undo the nuts fully on the struts with lid closed. These are on knuckle joints (like what you’ll probably graze at some stage) and just push out. There are flats on the inside to spanner against if the whole shooting match starts to turn. Drop the struts down the side and close the lid. You then need to undo the coachbolts that hold the hinge to the trailer (not the lid). Send a lacky into the trailer and get them to undo the nuts holding the hinges on. This may be impossible and to be honest I simply grind them off and then punch them through. When that is all done you can lift the lid off which, I promise you isn’t as heavy as it seems. Before turning the trailer over we loosen the wheel nuts. Two strongly folk can do this but as our Bazzer found out, much to his concern, it is actually quite heavy even with aid of a forklift and when it lands on your foot it hurts. He declines to assist in such matters these days. To be fair three people can do it.
Westfalia Spares
Although we do carry some spares for in-house repairs as a general rule we don’t supply parts. Parts can be sourced through Westloada Trailers. Delivery is about a week. www.westloada.co.uk contact email ak.mvm@ukgateway.net or trailers@westloada.co.uk.


